Thursday, July 12, 2012

Import files on Oracle MDS from Weblogic EM Console

In this post, I would demonstrate the method to upload your MDS (Metadata services) artifacts like wsdls, schemas, xsls etc onto the Weblogic server through the EM console.

The steps
 1. Create a zip called apps.zip having the hierarchy of folders and files as you want them on your local drive. So in the illustration below I wish to upload the xml schema Sample_Schema.xsd to the mds. Therefore I created the following hierarcy, the way I want it inside the root folder apps.


 2. Login to em console using http://<hostname>:<portname>/em and navigate to soa_infra > Administration > MDS Configuration


3. Import the zip onto the server by clicking the import button as shown below -


4. You will receive a success pop-up once the import was successful. 
You can now refer the mds file Sample_Schema.xsd in composite/wsdl etc via the url oramds:/apps/ProjectSchemas/SCP/Inbound/Sample_Schema.xsd


5. Likewise, you could export your mds files as well using the export button above.

Tuesday, June 12, 2012

Oracle 11g DB Adapter Unique Constraint/Sequence mismatch

In my last Project, I was using a DB adapter in my BPEL code. It was using an Oracle  seq 'DEMO_INSERT_S' as below -

DB Adapter with Sequence


Problem -


Even though the sequence was an Oracle generated sequence, I faced a unique issue in PROD. The sequence was incrementing of its own accord with no relation whatsoever with the actual seq.NEXTVAL. So while the DB adapter was generating a seq value say 101, it so happened that 101 already existed in the database resulting in a UNIQUE CONSTRAINT error! It took us some time to figure out the issue to be as follows -
Oracle BPEL DB Adapter follows or rather maintains a sequence of its own and does not exactly use the oracle generated seq.NEXTVAL.
Workaround -


So instead of providing the SEQUENCE in the DB adapter and let it have a mind of its own, we removed it from there and provided the Oracle sequence generated NEXTVAL in the xsl transformation.
So here's the mapping for the primary key of the DEMO_INSERT_TABLE. We are no longer dependent on the DB adapter for the sequence, instead we use the bpel extension function oraext:sequence-next-val to derive it from the actual Oracle Sequence i.e. DEMO_INSERT_S and pass it to the DB adapter mapping xsl.


<ns1:DemoInsertTable>

     <xsl:for-each select="/ns0:ChangeOrderCanonical/ns0:Parts">
        <ns1:GglPlmItemUpload>
          <!--ns1:id>
            <xsl:value-of select="oraext:sequence-next-val('APPS.DEMO_INSERT_S','jdbc/MyDataSource')"/>
          </ns1:id-->
 <!-- other column mappings -->
</ns1:DemoInsertTable>

This resolved my issue and hope it helps you too! 


Thursday, May 17, 2012

Validate XML against XML Schema using Java

Taking up the Employees.xsd schema and Employees.xml again for this illustration as well.
We want to validate the xml instance against the schema and want to achieve this through Java code. Not challenging, eh? Ageed, however thought I'd pen it here for future references.

Here's the code that achieves it -
public class SchemaValidation {

  private static void validateXML(File sourceFile, File schemaFile) throws IOException,SAXException {

    SchemaFactory schemaFactory = SchemaFactory.newInstance(XMLConstants.W3C_XML_SCHEMA_NS_URI);

    Schema schema = schemaFactory.newSchema(schemaFile);

    Validator validator = schema.newValidator();
    try {
      validator.validate(new StreamSource(sourceFile));
      System.out.println("is valid");
    } catch (SAXException e) {
      System.out.println("not valid because " + e.getLocalizedMessage());
    }
  }

  public static void main(String args[]) throws ParserConfigurationException, IOException,
      SAXException {

    File file = new File("Employees.xml");
    File schemaFile = new File("Employees.xsd");
    SchemaValidation.validateXML(file, schemaFile);
  }
}
So when I try validating the XML below against the Employees xsd schema -

<?xml version="1.0" encoding="UTF-8"?>
<tns:Employees xmlns:tns="http://www.example.org/Employees">
    <tns:Employee>
        <tns:Name>tns:Name</tns:Name>
        <tns:ID>tns:ID</tns:ID>
        <tns:Designation>tns:Designation</tns:Designation>
        <tns:Dept1>tns:Dept</tns:Dept1>
    </tns:Employee>
</tns:Employees>

I get the output -
not valid because cvc-complex-type.2.4.a: Invalid content was found starting with element 'tns:Dept1'. One of '{"http://www.example.org/Employees":Dept}' is expected.

So you see, the XML Parser pin points the exact error location along with the resolution. So for the above case it expects a <Dept> tag whereas what I pass is <Dept1>. Hence, the error.


Wednesday, May 9, 2012

Append Nodes to a an existing XML via XSL

Many a times we have a need to manipulate an xml to append similar repeating nodes to it. This post addresses that need through a very simply written xsl.
For the context what I have here is an Employees xml schema as below -
<?xml version="1.0" encoding="UTF-8"?>
<schema xmlns="http://www.w3.org/2001/XMLSchema" targetNamespace="http://www.example.org/Employees" xmlns:tns="http://www.example.org/Employees"  elementFormDefault="qualified">

<element name="Employees">
<complexType>
<sequence>
<element name="Employee" type="tns:empType" minOccurs="1" maxOccurs="unbounded" />
</sequence>
</complexType>
</element>
<complexType name="empType">
<sequence>
<element name="Name" type="string" />
<element name="ID" type="string" />
<element name="Designation" type="string" />
<element name="Dept" type="string" />
</sequence>
</complexType>
</schema>


I have an xml corresponding to the above schema as shown below -

<?xml version="1.0" encoding="UTF-8"?>
<tns:Employees xmlns:tns="http://www.example.org/Employees"
xmlns:xsi="http://www.w3.org/2001/XMLSchema-instance" >
<tns:Employee>
<tns:Name>Jack</tns:Name>
<tns:ID>1</tns:ID>
<tns:Designation>Developer</tns:Designation>
<tns:Dept>Java</tns:Dept>
</tns:Employee>
<tns:Employee>
<tns:Name>Bill</tns:Name>
<tns:ID>2</tns:ID>
<tns:Designation>Architect</tns:Designation>
<tns:Dept>SOA</tns:Dept>
</tns:Employee>
</tns:Employees>

All that I would be doing is copying the entire xml in its entirety and then appending an extra tag to it after the last one. The xsl for achieving this is as below -
<?xml version="1.0" encoding="UTF-8"?>


<xsl:stylesheet version="1.0"
xmlns:xsl="http://www.w3.org/1999/XSL/Transform" xmlns:tns="http://www.example.org/Employees"
exclude-result-prefixes="#default tns">

<xsl:template match="/">
<tns:Employees>
<xsl:for-each select="/tns:Employees/tns:Employee">
<xsl:copy-of select="." />
<xsl:if test="position()=last()">
<xsl:call-template name="append" /> </xsl:if>
</xsl:for-each>
</tns:Employees>
</xsl:template>
<xsl:template name="append">
<tns:Employee>
<tns:Name>Demo-Name</tns:Name>
<tns:ID>3</tns:ID>
<tns:Designation>Demo-Designation</tns:Designation>
<tns:Dept>Demo-Dept</tns:Dept>
</tns:Employee>
</xsl:template>
</xsl:stylesheet>


The template named 'append' contains the new <Employee> tag that needs to be appended.
So the output xml obtained after executing the above xsl with the Employees.xml as input is as below -

<?xml version="1.0" encoding="UTF-8"?>
<tns:Employees xmlns:tns="http://www.example.org/Employees">
<tns:Employee xmlns:xsi="http://www.w3.org/2001/XMLSchema-instance">
<tns:Name>Jack</tns:Name>
<tns:ID>1</tns:ID>
<tns:Designation>Developer</tns:Designation>
<tns:Dept>Java</tns:Dept>
</tns:Employee>
<tns:Employee xmlns:xsi="http://www.w3.org/2001/XMLSchema-instance">
<tns:Name>Bill</tns:Name>
<tns:ID>2</tns:ID>
<tns:Designation>Architect</tns:Designation>
<tns:Dept>SOA</tns:Dept>
</tns:Employee>
<tns:Employee>
<tns:Name>Demo-Name</tns:Name>
<tns:ID>3</tns:ID>
<tns:Designation>Demo-Designation</tns:Designation>
<tns:Dept>Demo-Dept</tns:Dept>
</tns:Employee>
</tns:Employees>
You see the new <Employee> appended right after the last <Employee> tag of the original xml.Hope it helps! 


Do let me know if you face problems with xml manipulation using xsl. I'll be happy to help :)


Friday, January 28, 2011

Java Client to Query ESB in Oracle SOA 10.1.3.x Suite

All that can be viewed on the ESB console can be accessed through the ESB client API as well. Infact, that is what works at the backend when the browser displays pages.

The jar needed in the classpath of  our java client (that will query the ESB) is the oraesb.jar available in /integration/esb/lib folder

To begin with, a wrote an ESBHandler class and added a method that connects up with the ESB using the oracle.tip.esb.client.ConsoleClient interface as below -


Now, all you have to do is invoke the perform method on the above client instance and provide the action you want to execute as the first param and a relevant/blank HashMap (acting as request parameters) as the second param. Like in my sample code below, I have queried the ESB to get the deployed DVM maps.You can likewise execute all the commands present in the package oracle.tip.esb.configuration.servlet.command as per my understanding :)

The above yields as output -

DVMs -->
 <getAllDVMs>
  <dvm name="SampleDVM1">
       <description>DVM description</description>
    </dvm>
 </getAllDVMs>

Monday, January 10, 2011

Java Client to Query BPEL processes in Oracle SOA 10.1.3.x Suite

Already existing console views for BPEL and ESB is good but there might be situations where you need to create your own customized console view based on business/functional requirements or you might need to generate a report on deployed services etc for customer. In such scenarios this blog might come in handy because it talks about java code to access BPEL processes deployed on Oracle 10g server. There is a separate blog post that talks about accessing ESB services.
 
1. The jars that need to be placed in the build path are as below -
  • orabpel.jar - bpel/lib
  • orabpel-common.jar - bpel/lib
  • oc4j-internal.jar - home/lib
  • optic.jar -opmn/lib

 2. To connect to the BPEL server the code is as below since we use rmi connection -

 where securityCredentials is the password for the 10g server.

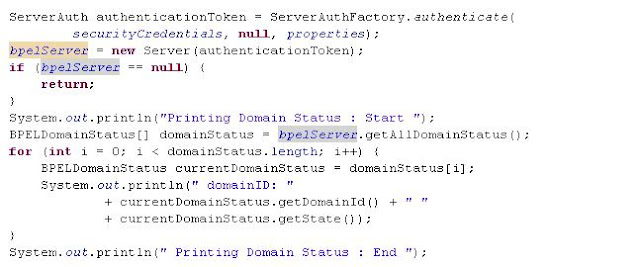
3. Now connect to the server and fetch all the domains available in there....


4. Now using the API from orabpel.jar, query the domain for processes and corresponding properties.

 
 5. A typical output of the entire code called from a Java client is shown below. Use similar code from your web project to create a totally different console view etc


Thursday, December 23, 2010

Oracle OSB 11g installation steps

I have been trying for quite some time to come up with the correct steps required for a successful installation of Oracle 11g OSB so that OEPE can be integrated with weblogic server during design time itself.

So finally have a few internet links and pointers towards the correct installation steps. Here you go....


The steps from the beginning are as below-

1. Download wls1033_oepe111150_win32.exe from otn download site by clicking on "Oracle WebLogic Server 11gR1 (10.3.3) + Coherence + OEPE" link. This has WLS along with coherence and the eclipse IDE with OSB capabilities.

2. Install it by extending an existing domain or creating a new one. Remember to create a domain with the check box - OSB Extension - All Domain Topologies clicked if you want to use the same server for running both SOA as well as OSB. For standalone OSB server you can select the Single Server Domain Topology. The next steps will let you create Admin and Managed servers (osb_server1).

3. Now download ofm_osb_generic_11.1.1.3.0_disk1_1of1.zip from otn download site by clicking on "Generic Installer for all platforms". Once unzipped, run the set up by clicking on

inside Disk1 directory.


4. Select Typical install radio button and click Next. A screen as below should come up with the text boxes auto filled corresponding to your WLS+coherence+OEPE installation-
  

Click next. If all pre-requisites are met, the installation will start automatically and the log file will be available at C:\Program Files\Oracle\Inventory\logs directory.

5. You will see something as below as the installation progresses -

6.  Once done, start the admin server followed by the osb_server1 as the managed server.

Happy OSBing! :)


Useful links -
for standalone OSB installation - http://chrismuir.sys-con.com/node/1641272/mobile

for OSB and SOA Suite using the same server - http://blogs.oracle.com/mneelapu/2010/05/soaosb_in_same_jvm.html